|
In
this series I have talked about storing and organizing music
files on your PC’s hard drive. If you have been following
along you should have a sizable collection of music stored on
your PC. You’ve learned about organizing the stored music
by Artist / Album / Genre / Song Title, and we have discussed
creating Playlists. Last month we talked about Internet Radio
and how a cable I hope that over the last five months you have installed a player, moved your music from CD & vinyl to your PC, created a Playlist, a custom Audio CD, and tuned into a Internet Radio broadcast. Cool stuff! Now we are going to talk about sending that collection of music to multiple locations in and around your house. And we’re going to explore how every location can play a different selection of material at different volumes simultaneously from one PC Music Server. The ConceptA Pentium or Celeron computer with a good network connection and large hard drives can serve MP3 or WMA files to more locations than you will ever need in a typical home. Now that you have music organized on a PC why not use that one central library to send music to locations throughout your home. Turtle Beach™ has a graphic, which I’ve inserted below. The picture explains the concept better than words 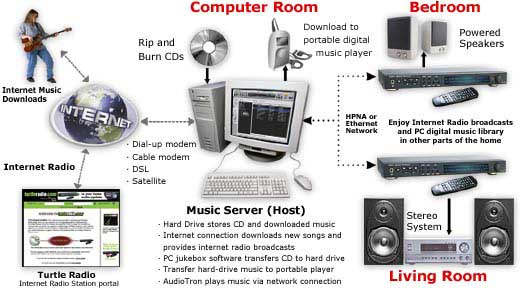 Using your existing PC, broadband Internet connection, and home network, they have developed a stereo component that requests songs from your PC through a home network, and plays them on your stereo, Home Theatre, or powered speakers. The Turtle Beach AudioTron™, Sonic Blue Rio Receiver™, and Motorola SimpleFi ™ are just a few of the devices on the market today that enable a music distribution system. Using a Portable player to bring your collection to your StereoIf you own a portable MP3 player
or even a DVD player that allows playback of DATA MP3 CD’s
you can use the sneaker method of connectivity by loading your
portable device with songs from your PC. Then connect the portable
device toyour stereo. Just use the 1/8” to stereo RCA jack
connector we discussed inlast months article to connect the Headphone
or Line Out of the portable device to your Auxiliary or Tape
Monitor In on your stereo receiver. Set up your Or create an Audio or DATA MP3 CD using the techniques you learned in Article 3 of this series. If you own a fairly new DVD player, just make a DATA MP3 CD using one of the jukebox programs we have discussed and pop it in the DVD player for hours of music. Most DVD players will accept an M3u playlist so you can set an order for playback of the music. At the very least you can make an Audio CD to play on your CD player and stereo. Connecting your PC to your StereoThere are several ways you can connect your PC to your stereo, and the method you choose is dependent on several factors:
Poor Man’s Music DistributionYou can bring your PC music to your stereo for as little as $19.95 if your PC happens to be located in a room adjacent to your stereo. How you ask? Well the same way you connect your Tape Player or DVD player. A simple audio cable connection from your PC’s line out to your stereo’s Auxiliary / Tape / CD etc. input. If your stereo is less than 20’ away you can buy a pre-made cable, typically a 1/8” stereo phone jack to dual RCA jacks. Drill a small hole in your molding and run the cable directly from your PC to your stereo. If the distance is greater than 20’ you can still use a cable, but you will probably need to make a custom cable. Materials for making a cable and the tools necessary can be purchased at stores like Radio shack, or from outlets you can find on the web. The down side of this setup is that the music must be started on the remote PC and you will not be able to remotely change the song selection. To control the volume, you can use the remote control for your stereo system if your system has one. Otherwise, on older stereos, you’ll have to get up and fiddle with the volume control on the stereo receiver. Check this months PC World© for more details. Wireless Music Distribution
The down side of this setup is that the 2.4gHz frequency it transmits on is susceptible to interference from microwave ovens and some portable phones. The sound quality is also diminished and you may hear hiss and noise at low volumes. Network Audio AppliancesBy far the coolest way to listen to your PC music collection is on one the new breed of network enabled audio appliances. Manufacturers like, Turtle Beach, Sonic Blue, Phillips, Onkyo, and BOSE all sell devices that can connect to your PC home network. These units can play your PC’s music collection anywhere in your home that a network connection is available. Turtle Beach AudioTron™There are several manufacturers of Network Audio Appliances. I’m going to use the Turtle Beach AudioTron as an example for several reasons:
Here’s a picture of the unit: 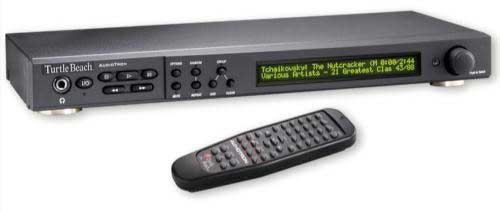 And here’s the units rear panel connections: 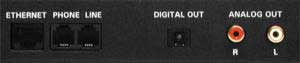 Connecting a Network Audio ApplianceIf you have a wired Ethernet or HPNA network already installed in your home, and one of the wires you installed is near your home stereo, you are all setup to connect the AudioTron to your PC. Just plug in the network connection and then connect either the analog or digital out of the AudioTron to your stereo. There are also PC file share and network configurations that will need to be setup as well, but those configurations are outside of the scope of this article. All the manufacturers have diagnostic and setup programs available to help you configure your PC and network to allow the unit to share your music collection. In order to access your music collection
your music server PC will need to be left on, or you can opt
to install a NAS (Network Attached Storage) Server. Either way,
the music files need to be on-line in order for the AudioTron
(AT) to access and play them. The AudioTron doesn’t store
any of the music internally, but rather, creates a directory
of where on your network a particular song file is stored. When
you select a song, the AudioTron reads the location from its
memory and goes out over the network to “fetch” it.
The AudioTron then “Streams” the song file across the
network connection and handles all the audio decompression and
digital to analog conversion. The actual audio is then sent out
either the digital or analog connection to your The AudioTron and other devices in this category will also allow playback of Internet Radio without the PC being on if you have a DSL or Cable router. I find that I use Internet Radio more often than my PC music library simply because the PC isn’t always on. Internet Radio is a great wake up setting for the alarm clock function I mentioned before. Windows Media PC’sThis year Microsoft in collaboration with Hewlett Packard and other PC vendors has introduced a new breed of PC that is designed to be the brains behind your entertainment center. These PC’s are equipped with Microsoft products that allow you to send both audio and video content stored on your PC’s hard drive to your TV and stereo. You will pay for the convenience of having everything pre-installed, but if you have the wallet size and don’t enjoy fiddling with PC and stereo components, this is an easy way to get all the gear you need set-up and ready to go. Just add a wired or wireless network and you can transmit audio and video to other PC’s and network enabled audio / video devices. Whole House Music DistributionAt the very high end of the spectrum you can hire a consultant to install and configure a personalized audio / video distribution network. This can be very expensive in an existing home, but if you are building and / or remodeling your home consider installing cabling while the walls are open. Even if you don’t buy all the gear to enable whole house audio / video distribution now, having the wiring pre-installed will allow you to add both audio / video distribution as well as home automation and PC connectivity quite easily in the future. Hi end audio stores such as Tweeters and Harvey’s have recently added all sorts of network enabled gear to their inventories and have specialists who can help you design and install Home Theatre and Whole House Audio / Video distribution networks. The sky and your wallet are the only limits in this category. Frank’s do it yourself whole house audioFor my house I have a combination of all the techniques described above. Over the last few years I have wired the house with Ethernet cabling, run speaker wire and mounted outdoor speakers with volume controls on both my front porch and rear deck, and added the Turtle Beach AudioTron to my living room stereo system. My most recent addition is a Pocket PC and a wireless access point. Here’s a typical scenario of how I use this network of do it yourself pieces. My music server PC is in the very front of my home and wired with a coaxial digital connection to my Sony receiver in the same room. I use the analog output of my soundcard to connect to an old power amp which is hard wired to outdoor speakers mounted on the outside of the studio. So in the front of the house I can be listening to a Beatles album in my studio while my wife is listening to Internet Radio outside in the garden. Since I have the RF remote control attached to my computer she can change stations and conrol the volume on the outdoor speakers from the garden as well. At the same time my daughter can
be upstairs in her room and through the wired Ethernet connection
to her computer, she can listen to the Dixie Chicks on her PC
and speakers. Later we can have the living room stereo playing
a party mix from the AudioTron using the same library of music.
The living room stereo is wired to speakers on the back deck
so I can party while I’m cooking. And with the addition
of the Pocket PC and wireless access point, I can control the
Wrapping upI hope you’ve both enjoyed
and learned from this series on Digital Music. I have covered
a lot of ground in this series of articles and I’ve only
scratched the surface of what you can do. As you contemplate
how you can implement your own Digital Music Library, remember
that you don’t have to spend a lot of money to enjoy a large
number of the benefits of storing your music collection on a
PC. I’ve given you some tips, tricks, and ideas, but don’t
be bound by what
Listing of links to sources quoted in the series Jukebox & Audio Editing VendorsCables & AccessoriesInternet RadioNetwork Enabled Audio |
|
Frank Powers has extensive digital music experience, working for companies like Voyetra Turtle Beach, Inc and Sam Ash Music, as well as composing his own material and running an Internet radio station. Frank is available for digital music consulting and can be reached by email at: frank@franksamericana.com. You can find out more by visiting his website at http://www.franksamericana.com. He also can be heard on the Internet at Frank's Americana(tm) Live365( Internet Radio station at http://www.live365.com/stations/fpowers |


 You
can also bring your PC music to your stereo by acquiring a RF
transmitter /receiver from vendors like X10 and Turtle Beach.
The units sold by these companies are very similar and allow
remote control operation of the volume and song selection. The
receiver is connected to your stereo Aux or Tape Monitor inputs,
and the transmitter is connected to the Line Out on your soundcard.
The Turtle Beach unit comes with connecting cables and a splitter
cable to attach to your soundcard so that you can still connect
your PC speakers to the soundcard Line Out. Additionally you
will need a free Serial Port on your PC to connect the Remote
Control receiver to your PC. With the remote control receiver
connected, you can select up to 20 pre-configured playlists,
radio stations, or Album / Artists / Genre combinations. You’ll
also be able to control volume, and skip forward or backwards
within any of the “Favorites” you configure. If you
attended the DACS meeting last month, this was the setup I was
using to start and stop the songs I selected.
You
can also bring your PC music to your stereo by acquiring a RF
transmitter /receiver from vendors like X10 and Turtle Beach.
The units sold by these companies are very similar and allow
remote control operation of the volume and song selection. The
receiver is connected to your stereo Aux or Tape Monitor inputs,
and the transmitter is connected to the Line Out on your soundcard.
The Turtle Beach unit comes with connecting cables and a splitter
cable to attach to your soundcard so that you can still connect
your PC speakers to the soundcard Line Out. Additionally you
will need a free Serial Port on your PC to connect the Remote
Control receiver to your PC. With the remote control receiver
connected, you can select up to 20 pre-configured playlists,
radio stations, or Album / Artists / Genre combinations. You’ll
also be able to control volume, and skip forward or backwards
within any of the “Favorites” you configure. If you
attended the DACS meeting last month, this was the setup I was
using to start and stop the songs I selected.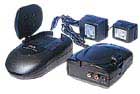 The
benefits of this setup are:
The
benefits of this setup are: