External USB Drive Enclosures By Bruce Preston On the news this morning (Nov. 24 2011) it was mentioned that the availability of hard disks for computers will become scarce for the next six to nine months because of the flooded factories in Thailand, where roughly 40% of consumer-grade hard disks are manufactured. So it was recommended that if you are about to purchase a PC, or increase your capacity by purchasing a new hard disk, that you do it now while there is still inventory. I have had many people ask how to retire an old desktop or notebook computer, with emphasis on maintaining the privacy of data stored on the computer. For many years DACS refurbished donated computers, wiping the hard drive and installing fresh copies of the Windows operating system. However the price of new computers has come down so much that it just is not cost effective to do so, and there is essentially no market for used computers, and in many cases you have to pay environmental disposal fees. I was thinking about this when I also remembered that at the Ask DACS sessions for recent General Meetings, the topic of external USB drive enclosures came up and there appeared that for many where is a lack of awareness of these devices. Thus the inspiration for this article – I’d like to describe USB external drive enclosures using two relatively inexpensive models as examples. Inland 3.5” IDE to USB Hard Drive Enclosure.
Installing the drive in the enclosure: Remove the end cap that has the On/Off switch, the power connector, and the USB data socket. Connect the power plug that is on the inside of the end cap to the drive, and the ribbon cable to the drive. It is not necessary to change any jumpers on the drive. Slide the drive into the enclosure and fasten it to the enclosure using the four screws provided. There is a pair of trim strips that cover the drive mounting screws. Fasten the end cap to the enclosure using the four screws provided. Plug in the external A/C power adapter (the usual “wall wart” transformer) and connect the USB cable to your computer. The computer should immediately recognize the drive and assign it a drive letter such as E:. You may now use the drive as you would any other hard disk. For best throughput you want to connect it to a USB 2.0 port, although it will work at reduced speed with USB 1.1. You do not need to repartition the drive or format it, your data will be there. However if you don’t need the data, you might consider deleting the partition(s), create new partition(s) and format it with NTFS format. Inland u-Jam 2.5 Hard Drive Enclosure USB/IDE
The external drive enclosure is about the size of a deck of cards, although a bit thinner. Remove the 4 small screws that hold the cover plate to the frame, plug the single ribbon connector into the drive, and seal it up. This enclosure makes use of a three-ended USB cable. The end of the cable that attaches to the computer has two plugs so that the drive may draw power from two USB sockets. While the drive’s power consumption is low enough that it doesn’t require an A/C power adapter, it needs just a bit more power than is available from a standard USB port. By using two ports there is enough power for the drive. Connect the drive to your computer and the operating system should identify it and assign it a drive letter. As described above, you may immediately make use of the drive as is, or repartition it and format it if you like.
What you don’t get by using a ready-made external hard drive is the software that is often bundled with such a package. Such software offers “One Touch Backup” can be convenient, but I don’t find it to be a compelling reason to go out and purchase a new drive when you may reuse a drive that otherwise might end up in a land fill.
|
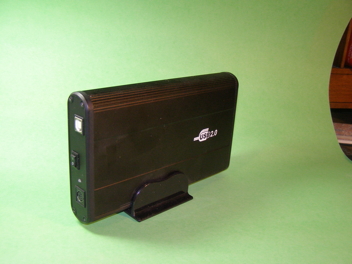 3.5” IDE (Integrated Drive Electronics) hard drives were the standard desktop IDE drive technology from about 1990 to the present, although SATA drives are now becoming more prevalent. The 3.5” refers to the diameter of the disks within the drive; the drive itself is designed to fit in the 5” drive bay. If you are retiring a desktop it probably has a 3.5” hard drive (or two!) They are usually attached to the chassis of the computer in either of two ways:
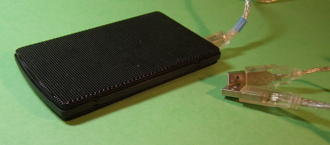 The most common hard disk in notebooks older than about 2 years is the 2.5” IDE drive. More often than not it is accessible via a hatch on the bottom of the machine. Remove the hatch cover and you will usually find the drive in a metal “caddy” that can be flipped out. Remove the drive from the caddy, and remove any right-angle adapter at the connector edge of the drive. There is no separate power connector.
 I make use of my external drive enclosures several ways:
 Click Here |
 |
 |
DacsGear!
|